Showing posts with label birthday. Show all posts

Friday, June 19, 2015

Mario Make a Wish Birthday!

Today's card is a fun kids card featuring a Punch Art "Mario" from Mario Brothers.  I created this for one my son to take to a Marion Cart birthday party.  I can tell you everything I look at this I smile.


I used a series of circles both plain and scalloped to create this Mario.  Foam adhesive helped me achieve dimension.  The radial checked background is the perfect backdrop for this Mario Cart race inspired card.  I hope to do a tutorial soon, to show you the shapes and steps in making this fun card.


Happy Crafting,
Melanie

Wednesday, June 17, 2015

Masculine Happy Birthday Everyone Card

Sometimes Masculine cards are tough to figure out.  I have found that when you add corrugated card stock  to a project or card it instantly makes it easier.  


I used a standard A2 craft card base and added a piece of 4.25" x 3.25" piece of corrugated card stock to the upper right corner.  The other pieces are the Die-namics "Happy" die from My Favorite Things, the Stampin Up! "Top Note Die" and the "Birthday" is from MFT "Happy Everything" stamp set.  There is also a little jute twine in the upper corner to add some additional texture and interest.  


Using these word dies has been so much fun, I hope that this gives you some ideas and inspiration to use corrugated card stock on your next project.  Stampin Up! is now carrying it the new catalog.  Let me know if it is something that interests you and and I would be happy to place an order.


Happy Crafting, 
Melanie


Monday, June 15, 2015

Happy Everything Gift Bag

Today's post is using another My Favorite Things Die-namics, "Happy" and the "Happy Everything" stamp set.  I have used another die from this set before on a birthday card and loved how it makes a statement.  Click here to check out the card.


I used a plain craft brown bag and cut the "Happy" out on some thin chip board and some teal foil paper.  I adhered the layers together and glued onto the bag.  I stamped and the "birthday" sentiment and added some glitter embossing powder to compliment the shinny "Happy".   


This was perfect for the party.  I hope this inspires you to use your WORD dies for more than cards.


Happy Crafting,
Melanie


Monday, February 2, 2015

Best friend on the Block, Lego Valentines


If you have boys like mine they love everything Lego.  When I asked them what they wanted to give for a Valentine and mentioned my Lego idea they were cheering with excitement.  I originally came across this idea when I was planning a Lego Themed Birthday and thought it would make and affordable class Valentine as well.


The supplies you will need are child size ring blanks (purchased my from eBay), 2x2 Red Lego Bricks, 3"x 4" clear treat bags, Valentine Scrapebook Paper, Heart Punch and Printer.


Rings not your thing, stay tuned foe my next post, it will be Lego Key Chain.
Happy Crafting,
Melanie

Tuesday, November 4, 2014

Circle & Texture Happy Birthday Masculine Card

Can I say, I love the new crafting supplies that I have gotten recently.  I feel much more like myself when I can get in my craft room and have a few moments to myself.  That is hard with three boys running around, but I am sure going to make more of an effort.


This was a fairly simple card that I made to celebrate my Father-in-Law's birthday this week and only took about 15 minutes to make.  I used the "happy" die cut and the "Birthday" Sentiment is from My Favorite Things.  


For the Chevron Background I used Texture Paste and a Tim Holtz Chevron Stencil.  I only used the center chevron and masked over the ones I didn't need.  I let that dry for a moment and the I punched out some circles.  The largest circle is photo paper that I experimented with ink and water.  I think it add a touch of whimsy to the card.  The other circles were cut from scrap papers that I had on hand.  I think enamel dots would look nice on this as well.  I used foam dots and glues dot to assemble the layers.


I can't wait to get onto the next project.  This was so much fun!
Happy Crafting,

Melanie


Friday, August 9, 2013

Banner Birthday - Make a Wish

I have never really created a banner card before and have been inspired to try from seeing all my fellow crafty friends posts.  Here is my first attempt.  


I used the "Hearts A Flutter" stamp set and framelits as well as "Sweet Essentials" for the sentiment.  This is one of my favorite sentiment sets from Stampin Up.  The center piece flower is from the "Blossom Party" die. 


Have you made a banner card lately?  I hope this inspires you.
Happy Crafting,
Melanie

Tuesday, July 2, 2013

Yippee, Make a Wish!

This adorable birthday card was made for my nephew's first birthday.  I thought the retired, Moving Forward, stamp set worked great for this card.  The sentiment is from Sweet Essentials, one of my new Stampin Up favorites.


Since this was a first birthday card, I wanted it to be fun.  I can't help but smile when I see this little frog and the bright colors really make the card cheery.  Perfect for a first birthday or any other.


Don't forget to stamp the inside of your cards and your envelopes too.  It just adds that extra touch.
Happy Crafting,
Melanie

Wednesday, June 5, 2013

Strawberry Fun Birthday

I don't know about you, but I love this time of year.  I especially love visiting our local strawberry patch with my boys.  This visit inspired the SWEET birthday card.


To create the strawberries on this card I used the heart from the "Hearts a Flutter" framelits and ran them through the a polka dot embossing folder.  The green portion is from an EK Success flower punch that I folded in half.  These strawberries are backed by Stampin Up's "Window Frames Collection" framelits.  This sentiment banner is something that I typed and printed from our home computer.  I added a scallop trim and sewed on for some interest.


This sure makes me hunger from some delicious sweet strawberries.
Happy Crafting,
Melanie

Wednesday, May 29, 2013

Look Who is Turning Six!

This seems to be the party season and my eldest son, Tyler really enjoyed going seeing his friends.  Here is a quick card I made using the Mini Curly Label Punch, Pretty Petite Stamp set and some fun Designer Series Paper.  To make the number "6" I used my Cricut, because I didn't have a number stamp set. 


I think this really makes a great children's card.  Just change the DSP for different looks.
Happy Crafting,
Melanie

Friday, October 12, 2012

Happy Birthday Everything Eleanor

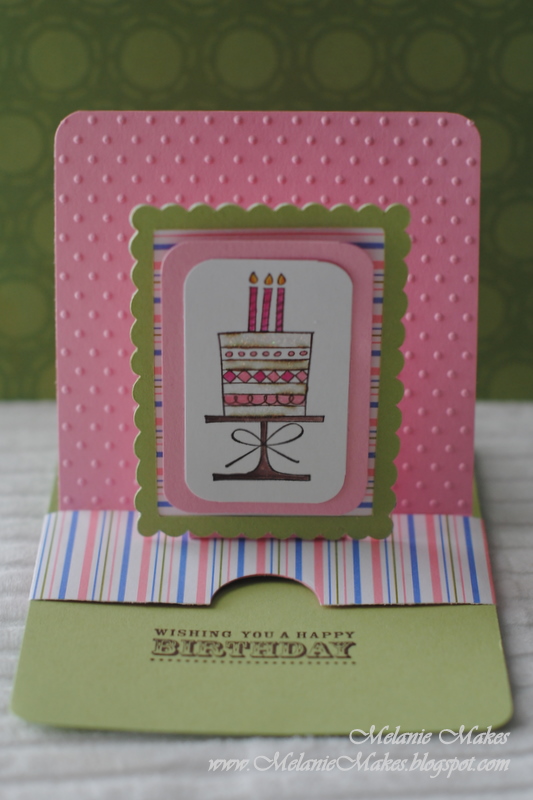
What better excuse to get back into my craft room than to create a birthday card for a close friend.  I just got some new stamp sets from Stampin Up and wanted to try them out.  

For this card, I used the Everything Eleanor stamp set and Cafe Comfort Designer Series paper.  I actually had to break out my scissors to cut some of the pieces, which is new for me.  I usually like to go with punches or die cuts.  It was very easy, so I will be cutting embellishments more often.


I used the Friendly Phrases stamp set for the sentiment.  This is a new set for me and it has so many great sentiments to use for a variety of occasions.


Now no birthday isn't complete without a little gift, I used the Stampin Up's Fancy Favor die box to create this cute bag.  I didn't have any coordinating tissue paper, so I ran some card stock through my paper shredding to finish it off.
Happy crafting,

Melanie


Wednesday, June 6, 2012

It's a Birthday Celebration!


This card was designed for a card stack class that I was planning.  It is another one that can be used as a masculine or feminine card.  Who doesn't like a cupcake?

This was made using the Stampin Up, "Creat a Cupcake" stamp set and the "Cupcake Builder Punch".  The papers I used have are the recently retired, "Just Add Cake"


Happy crafting,

Melanie

Sunday, May 27, 2012

Wedding Cake Pops "I Do" Tags

Photo by Diana H.
For my most recent adventure, I made these "I do" cake pop tags for a friend's wedding.  They are very into their perspective football teams, the husband a NY Giants Fan and the wife a Clemson Fan.  I think these fit the occasion perfectly with the their team colors.

Photo by Diana H.
This is such an easy project that could be used for any celebration; birthday, anniversary, wedding, get well or thank you. Really your options are endless. The cake pop tags were made with simple punches (2" Scallop and the "I do" from the Cricut Sweethearts cartridge.

My other friend is the amazing baker and she made the cake pops for the wedding and took these wonderful pictures for me.  Thanks Diana!

Melanie

Wednesday, May 23, 2012

Happiest Birthday Wishes!


Here is a simple card that could be done in any color scheme to make it more masculine or feminine.  If you are like me a masculine card is always a little harder to come up with.


To make this I just used a series of squares and a corner rounder.  This is the perfect card for a beginner too, that might not have all the punches quite yet.  I used white card stock and Stampin Up's Pool Party paper. I also sponged the edges with coordinating ink Pool Party Ink from Stampin Up.  This in one of their "In Colors for 2011-2013".


I am sure you can come up with your own great combinations for this one.
Thanks for stopping by,

Melanie

Tuesday, May 15, 2012

Elegant Flower Birthday Wishes

Here is a cute birthday card that I made with the Stampin Up "2011-2013 In Colors", Lucky Limeade and Calypso Coral.  I also used the new Labels Collection Framelits Dies for the green background.  It coordinates so well with Stampin Up's other punches  I used the retiring "Funky Four" stamp set along with "Circle Circus"


Thanks for stopping by,

Melanie

Thursday, January 26, 2012

Cricut Craftin Friends Blog Hop

Cricut Craftin Friends Blog Hop 
Celebrating Cricut Craftin Grammys 1 year
Blogaversary


We're so happy you could join us for this hop celebrating the one year blogaversary of Cricut Craftin Grammy. I have asked a few of my Cricut Messageboard friends as well as my Design Team friends (Fantabulous Cricut Challenge Blog, Lasting Memories and Sweet Sassy Diva )to join her in this two day Blog Hop. The participants are allowed to share anything creative they wish to share using a Cricut (or other die cut machine if they do not have a Cricut.)

Overall Blog Candy

I hope you will hop along with us and leave comments along the way. Forthe overall blog candy you need to leave a comment on each blog each day.

If you leave a comment on all the blogs both days your name will be entered into the Random drawing twice. The random winner will receive a $25 gift card from their choice of Michaels or Joanns.

This is a TWO-DAY hop, so be sure to check out both days so you don't miss any creativeness. Because there is a large number of participants I will give you until January 30th to post your comments for the two days of the blog hop.  Thanks for joining us!

Let's get hopping!! If you've hopped over from Charlotte, then you are in the right place!! If you've just popped in to visit my blog or are reading this via email and you'd like to join our FUN, then please CLICK HERE to start at the beginning with Suzanne's Blog

For the hop today, I've created this adorable Sock Monkey Birthday Card.


Recipe:
"B is for Boy" Cartridge
Sock monkey cut at 4.25"H
Postage Stamp cut at 3.36"W x 5.75"H
Stampin Up - Happiest Birthday Wishes
Hemp Twine

Thank you again for checking out my project... Now hop to the next stop:  Beckie...
Remember to visit all the stops for MAXIMUM ideas and LOTS OF FUN!!

Suzanne http://cricutcraftingrammy.blogspot.com/
Also posting for Cindy who does not have a blog

Fantabulous Cricut Challenge Blog Friends
Charlotte http://alittlebitofdetail.blogspot.com/
Melanie http://melaniemakes.blogspot.com/
Beckie http://justbcreativecrazy.blogspot.com/
Faith Abigal http://www.faithabigaildesigns.com/
Kate http://smallbitsofpaper.blogspot.com/

Lasting Memories
Stacia http://happyandscrappytoo.blogspot.com/
Michele F http://fishmememoriesandmore.blogspot.com/
Elizabeth http://visionsofpaper.blogspot.com/
Karen http://creationsbykw.blogspot.com/
Denise http://thruthelookingglass-glassgraffitix2.blogspot.com/
Michelle http://scrappinforkenzie.blogspot.com/
Jennasa http://findtimetocreate.blogspot.com/
Kimberly http://leokc34.blogspot.com/
Amy http://www.lovetocrop.com/

Message Board Friends
Terri http://craftmeaway.blogspot.com/
Brenda http:// friendscraftinwithfriends.blogspot.com/
Rachelle http://creationsbyrachelle.blogspot.com/
Shawnee http://quiverofangels.blogspot.com/

Sweet Sassy Diva Blog Friends
Lori http://www.scrappinmystressaway.blogspot.com/
Mindy http://grammiescraftroom.blogspot.com/
Tina http://tiggersscrapplace.blogspot.com/
Jen http://3catsandabug.blogspot.com/

Thursday, November 17, 2011

Inking It Up Crazy Design Team - Fun Fold Card

It is time again for another DT challenge at Inking It Up Crazy, this week's challenge is to create a fun fold card.  Since I am fairly new at card making, I haven't ever attempted anything like this.  My first attempt was a peek-a-boo slider card, but the image I was using too big and I couldn't make it work (believe me I tried).  So, my take two was this pop up slider card.  There was a small learning curve on this, but it was actually pretty easy once I understood the mechanisms.   


There are so many examples of fun fold cards on YouTube, so I hope this inspires you to make your own.  Please check out what the other talented ladies have come up with at Inking It Up Crazy blog.
Have a great end of the week,
Melanie

Thursday, October 6, 2011

Inking It Up Crazy Design Team Post - “Cricutless” Challenge


Today is another Inking It Up Crazy Design Team Post and this one is the "Cricutless" Challenge.  I decided to use my favorite punches as the focal point.


The punches I used are the small and large Retro Flower Punches from EK Success.  I punched two large flowers, small scallop and two small flowers.  They are held together with a brad.  A scalloped border punch was used on the rectangular elements and birthday sentiment.  The pattern paper is DCWV and the sentiment is from "So Happy for You" from Stampin Up.


Please check out what the other ladies have made for this challenge over at Inking It Up Crazy.

Melanie

Saturday, October 1, 2011

World Card Making Day - Birthday Card


We are making more cards for World Card Making Day, I am participating with Inking It Up Crazy in several challenges she is having today.  If you missed my first post, check out my Holiday Card.  Our next card is one of my favorite cards to make, a Birthday Card.

This Birthday Card was made using the "B is for Boy" cartridge for the cute dog.  The grass is cut from the Plantin SchoolBook cartridge and the word bubble is from Create a Critter cart.  I used the Cuttlebug and the distressed stripes folder on the red background and added some yellow stitching   
.


There is more to come each hour, so check back at Inking It Up Crazy for more challenged and giveaways.
Happy Card Making,
Melanie

Wednesday, August 10, 2011

Dump Truck Birthday Celebration Card

This is a birthday celebration card that I made for our neighbor's third birthday.  I used my new cuttlebug again for the distressed stripes backgroung.  I thought it fit perfectly with the construction theme.  The dump truck is from the "B is for Boy" cartridge.  I cut it with all its layers at 3".  I tore brown paper to create the layers of dirt.  The stamp sentiment is from the Studio G Ditto series.  I can't wait to explore this cartridge some more.  There a lots of great images for both boys and girls, so don't let the title fool you. 


Have a great rest of the week!


Monday, August 8, 2011

Party Hat Celebration Birthday Card

This a recent birthday card I made using my newest crafting tool, the Cuttlebug.  The Cuttlebug is a  Embossing and Die Cutting Machine.  I just can't wait to get more cutting dies and embossingfolders for. 

This "It's Time to Celebrate" was with my Cuttlebug and My Little Shoebox papers.  I received these as part of my prize for being publishing in the Cricut Birthday Ideas Magazine.  The party hat was cut and embossed from a cuttlebug Mickey Party Accessory Set that I found on clearance at AC Moore.  I first cut out the hat first and then it had an accompanying embossing folder to add the details.  I have also been using my sewing machine more for some added details.  I add a zig-zag stitch to the background striped paper.  Enjoy the week!