Showing posts with label Stampin Up. Show all posts

Wednesday, June 17, 2015

Masculine Happy Birthday Everyone Card

Sometimes Masculine cards are tough to figure out.  I have found that when you add corrugated card stock  to a project or card it instantly makes it easier.  


I used a standard A2 craft card base and added a piece of 4.25" x 3.25" piece of corrugated card stock to the upper right corner.  The other pieces are the Die-namics "Happy" die from My Favorite Things, the Stampin Up! "Top Note Die" and the "Birthday" is from MFT "Happy Everything" stamp set.  There is also a little jute twine in the upper corner to add some additional texture and interest.  


Using these word dies has been so much fun, I hope that this gives you some ideas and inspiration to use corrugated card stock on your next project.  Stampin Up! is now carrying it the new catalog.  Let me know if it is something that interests you and and I would be happy to place an order.


Happy Crafting, 
Melanie


Sunday, June 14, 2015

Stampin Up! Happy Birthday Everyone!

Today's Birthday card showcases Stampin Up's new Hostess Stamp Set, "Happy Birthday Everyone".  It has many sentiments that can be placed below, but I thought the Happy Birthday sentiment work great by itself on this bright card.  

Below are the list of supplies Stampin Up! supplies that I used to make it:

Cardstock:  Bermuda Bay, Pool Party, Watermelon Wonder, Hello Honey, Cherry On Top DSP
Stamps:  Happy Birthday Everyone (hostess), Something To Say
Embossing:  Ploka Dot Impressions Embossing Folder
Punches:  Itty Bitty Accents Punch Pack
Accents:  Cherry On Top Washi Tape, Rhinestone Basic Jewels


Happy Crafting,
Melanie

Friday, June 12, 2015

Many Thanks Repeated Background

Hello everyone,
It has been awhile since my last post, but I have gotten in some new supplies and I am on a roll.  Some of my new goodies are from My Favorite Things (MFT) and Simon Says Stamp (SSS0 in making this "Thanks" card.  Let me give you the details on how I made it.


For the card I knew I wanted to do a thanks background with all the thank you stamps sets that I had on my shelf.  I used SSS Thanks,  Stampin Up!'s Curly Cute, Express Yourself, and Made for You.  I am loving the new Stitched Circles dies from SSS.  These are great to give your card that little extra detail.  The show piece of the card is the Thanks cut out with  MFT Many Thanks die. The green glimmer paper give it a little sparkle to make it special.  Finally, I used some Stampin Up ribbon and the flower from the Itty Bitty Accents punch pack.


I hope you enjoyed this card and it inspires you to look through your thanks sentiments to create a unique background of your own.

Getting inky means we are having fun!
Happy Crafting,

Melanie


Saturday, November 8, 2014

Trim the Tree with Christmas Cheer

This Christmas card was inspired by one of my most popular blog posts that I did three year ago.  You can check it out here.   The tree is the main focal point and I think its curves are timeless and that is what everyone likes about it.  So, why not use the same tree in another card?  Well, that is exactly what I have done and I like this card as much as the previous one.  Here is how I did it:


The tree I used from a Cricut Christmas Solutions, cut at 4.5" on green glimmer paper.  I first used Simon Says Stamp's "Bundle of Stitched Shapes".  If you look close you can see the stitching detail around the edge.  I them made it into the background with a stencil and texture or embossing paste.  The stencil is Tim Holtz's "Holiday Knit".  I just love the texture it adds and it's subtlety behind the tree.


For the red banner, I stamped it with Stampin Up's "Sweet Essentials" Christmas Cheer sentiment.  For the finishing touch, the holly and berries were added from Papertrey Ink's "Holly Jolly Die Collection".

I may be inspired to see what other backdrops I can come up with to support the star of this card.  That tree is
Happy Crafting,
Melanie

Friday, October 31, 2014

Fall Thank You for Teachers

Today, I wanted to share with you the Fall Thank You I sent to my son's teachers.   These are cute post it note holders with a fall theme.  I give these out often to not only teachers, but friends and family.


For the chevron background I used Stampin Up's "Positively Chevron" Background Stamp in Versa Mark Ink and Clear Embossed it.  The fall leaves are from a retired set from Stampin Up called, "Gently Falling".

I colored the leaves with distress inks and was pleased with how they turned out for my first try at using them.

I personalized the back with a punched out heart and stamped Bryan with Lawn Fawn's "Violet ABC's".


Super simple thank you for almost anyone.  If you missed my post yesterday for the Halloween Treat Bags stop by here.

Happy crafting,
Melanie

Thursday, October 30, 2014

Class Halloween Treat Bags


Happy Halloween!  I have missed my craft room terribly, but I have found my way back to make my son's Halloween Treat Bags for school.

Here is how I made them:

I used treat bags from the Dollar Tree, they came 40 for $1.  Can't beat that deal.  I then used the Top Note retired die from Stampin Up for the topper of my bag.  I wanted to give that some glimmer so I sprayed it with shimmer paint.  The Witches Hat is from another retired Stampin Up set, "Wicked Cool".  I stamped in black clear embossed to give it some more shine and texture.    I punched an oval and embossed it with the dots folder.  If  you look close you can see that I actually used the back side.  The "BOO" sentiment, which I changed to "EEK!" later on is Lawn Fawn's Violet ABC's.

I folded the treat bag over and stapled the banner and topper.  I then covered that up with the Witches Hat and oval punch with foam dots.


For the back I stamped my son's name Bryan on the back the the Lawn Fawn Violet ABC's.  I am getting a lot of use out of that set already.


I hope you enjoyed and it in spires you to do your own.

Happy Crafting,

Melanie


Tuesday, May 20, 2014

Affordable End of the Year Teacher Note Card Set

If you are like me you like a good deal and I love Target's $1 section.  I happened upon these cute black and white note cards sets.  My wheels instantly were turning on how I could take these up a notch.  You may have seem my other note card portfolios or gift card bouquet that I have done in the past for my son's teachers.  I now have three sons and our family is going many directions, so I don't have the time to do projects from the past.  This note card set will be equally special, but done during one or two afternoons while the kids are napping or still at school.


Here is the card set I purchased from Target's $1 bin:


Next, I used some Big Shot Alphabet Dies to cut out the monogram letters.  I cut out 9 for each; 8 for the note cards and one for the front of the portfolio.


Note Card Portfolio Dimensions:
8" H x 9.5" W
Score at 2" along the 9.5" section
Score in half at 4.75"

I hope you enjoyed this project and it inspires you to make your own.  They make a great gift or thank-you for anyone in your life.  I went back to Target and picked up a few more sets for my shelf.


Happy Crafting,
Melanie

Wednesday, October 30, 2013

Creepy Crawly Halloween Teacher Favor


Do you ever wonder what to do with those cute little sticky note pads that you see in the $1 at your favorite store?  Well, I just love to give them for gifts or favors.  This year I found some really cute Halloween ones at my Target store and I knew they would make the perfect little gift for my son's teachers.

I cut the craft card stock 3 1/4" x 6 5/8" and then scored at 3 1/4 from both edges.  These dimension might vary depending on the sticky note pad, so always measure twice and cut once.  Then I just adorned the front with some layered paper and the retired Stampin Up set, "Batty for You".


For the packaging, I used a clear bag and topped it off with embossed craft paper.  I cut the topper using Stampin Up's, "Labels Collection" framelits.


Great quick gift for those you want to know you appreciate them.  If you are looking for more ideas you can stop by and see what I did for the teachers last year, Click Here.
Happy Crafting,

Melanie

Friday, October 4, 2013

Have Yourself a Merry Little Christmas Series - Part Five

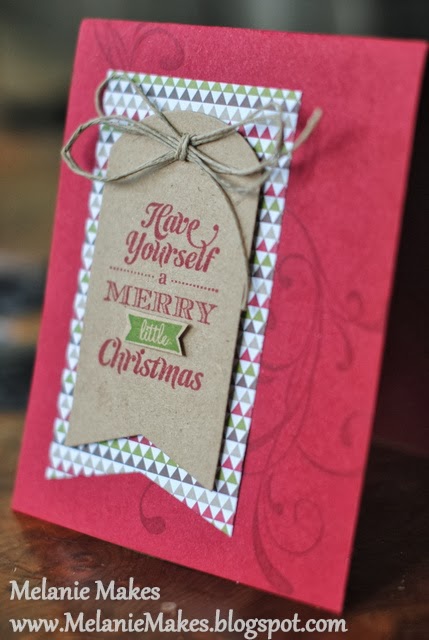
Welcome back to Part Five in the "Have Yourself a Merry Little Christmas" Series featuring Stampin Up's "Merry Little Christmas" in the 2013 Holiday Mini.


Today's is the final post in series and I have sure had fun creating with this set.  For this card I features the "Merry Little Christmas" stamp set along with the "Beautifully Baroque" set that is new in the catalog this year.  The background is stamped with the Beautifully Baroque set in Versa Mark ink.  I then stamped a craft brown piece of card stock and cut in out with the Window Frame framelit.  Added some bakers twine, faceted button and ribbon to finish it off.


If you missed out on Part One, Part Two, Part Three or Part Four of the "Have Yourself a Merry Little Christmas" series, please check them out for more inspiration on this stamp set.
Happy Crafting,
Melanie

Thursday, October 3, 2013

Have Yourself a Merry Little Christmas Series - Part Four

Welcome back to Part Four in the "Have Yourself a Merry Little Christmas" Series featuring Stampin Up's "Merry Little Christmas" in the 2013 Holiday Mini.


Today's post is very similar to yesterdays in the elements that I used.  This one is a little more festive and sparkly which is perfect for the Holiday.  I set the sentiment off with the snowflake from the Snow Flurry Bigz die and the Season of Style cut with an Apothecary Accent framelit.  For the background I used a sponge dauber and versa mark ink that I then heat embossed with red glitter embossing powder.  I really love the sparkle to set the tone for this card.


If you missed out on Part One, Part Two or Part Three of the "Have Yourself a Merry Little Christmas" series, please check them out for more inspiration on this stamp set.
Happy Crafting,
Melanie

Wednesday, October 2, 2013

Have Yourself a Merry Little Christmas Series - Part Three

Welcome back to Part Three in the "Have Yourself a Merry Little Christmas" Series featuring Stampin Up's "Merry Little Christmas" in the 2013 Holiday Mini.


In today's post, I am featuring a rustic card.  I set the sentiment off with the snowflake from the Snow Flurry Bigz die and the Season of Style cut with an Apothecary Accent framelit.  The wood grain embossed background adds the rustic feel.


If you missed out on Part One or Part Two of the "Have Yourself a Merry Little Christmas" series, please check them out for more inspiration on this stamp set.
Happy Crafting,
Melanie

Tuesday, October 1, 2013

Have Yourself a Merry Little Christmas Series - Part Two

Welcome back to Part Two in the "Have Yourself a Merry Little Chirstmas" Series featuring Stampin Up's "Merry Little Christmas" in the 2013 Holiday Mini.

For today's project we are featuring a festive wine bottle tag.  This tag would be easy to create on your own, but I used Papertrey Ink's "Wine Bottle Tag" die.  A modification of this was also show in the card created in yesterday's Part One of the "Have Yourself a Merry Little Chirstmas" series.  Please check it out.


The other stamp set in the background is one of my favorites from the "Everything Eleanor" stamp set and the the Labels collection framelits on top with a touch of the Season of Style DSP.


I hope you enjoyed this project and please come back tomorrow for Part 3 in the series.
Happy Crafting,

Melanie

Monday, September 30, 2013

Have Yourself a Merry Little Christmas Series - Part One


Looking for inspiration using the "Merry Little Christmas" stamp set from Stampin Up's 2013 Holiday Mini catalog?   I really fell in love with this set and have created several projects to help inspire you this holiday season.  Today's project is this beautiful Christmas card.


This Christmas card features the very popular banner style with Stampin Up's Season of Style designer series paper, Merry Little Christmas and Everything Eleanor stamp sets.  The larger banner was cut using Papertrey Ink's Wine Bottle Tag Die, with the top portion cut at score line.  The smaller banner was cut from another Papertrey Ink Die called, Tag Sale #5.  They layer and compliment each other really well.  This could easily be cut out if you don't have the dies.  I added a little bit of hemp twine to top it all off.
  

I hope you enjoyed Part One of the "Merry Little Christmas" series and please come back tomorrow to see the next project.
Happy Crafting,

Melanie


Thursday, September 19, 2013

Masculine Thinking of You

I really have been enjoying the "Sweet Essentials" stamp set from Stampin Up.  I just love the font!  Here is a card I was inspired from a Stampin Up post.  It was awhile back, but I thought I would try my take at it.  This is my masculine version of a birthday, thinking of you card.  


I used a window frame framelit that I cut in half and the cheveron is from the Tasteful Trim die.


Hope you enjoy and as always Happy Crafting,
Melanie

Wednesday, September 18, 2013

Banner Butterfly Trio

Welcome to the butterfly trio of cards.  I took a simple sketch to start the basis for my three designed.  I used the large banner as in beautiful blue paper adorned with butterflies.  The butterflies seen here are done with Stampin Up punches.  They are a great "go to" for cards, because who doesn't like butterflies.
  

Another great thing about these cards is that you could pair it with almost any sentiment; birthday, anniversary, sympathy or congratulations.

Here are a few more close ups:


Happy Crafting,
Melanie

Thursday, August 15, 2013

Dotted Birthday Present

I think I have found my new favorite color combo with Stampin Up's new In Colors.  I love the embossed Coastal Cabana and the scallop Crisp Cantaloupe poking from behind.  I used a sponge dauber and some versa mark ink to create the dotted background.  The sentiment is from Happiest Birthday Wishes retired hostess set.


Happy Crafting,
Melanie


Wednesday, August 14, 2013

Create-a-Cupcake - 10 Minute Craft Dash #23

Today I wanted to try something new and challenge myself with  Pretty Pink Posh's, 10 Minute Craft Dash Challenge #23 Birthday Theme.

This was so much fun and a little stressful at the same time.  I looked at my Pinterest boards and got an idea of what I wanted to do.  I set up my supplies and boy did I dash. 

Here is the card that I made using Stampin Up's Create a Cupcake stamp set and coordinating punch.


I can't wait to do this again, such fun!
Happy Crafting,
Melanie


Friday, August 9, 2013

Banner Birthday - Make a Wish

I have never really created a banner card before and have been inspired to try from seeing all my fellow crafty friends posts.  Here is my first attempt.  


I used the "Hearts A Flutter" stamp set and framelits as well as "Sweet Essentials" for the sentiment.  This is one of my favorite sentiment sets from Stampin Up.  The center piece flower is from the "Blossom Party" die. 


Have you made a banner card lately?  I hope this inspires you.
Happy Crafting,
Melanie

Thursday, August 8, 2013

To My Friend - Mojo Monday 305

It has been a long time since I entered any challenges, so I thought I would enter Mojo Monday's Contest #305.  Here is the sketch for the challenge and please feel free to play along too.

Since Fall is around the corner, I wanted to create a card that used richer colors.  I decide to break out my DSP from Stampin Up and make this card (I tend to hoard it).  This paper speaks fall to me and is from the recently retired Cafe Comfort collection.  I used the flowers from the Everything Eleanor stamp set and the sentiment is from Friendly Phrases.


Happy Crafting,
Melanie