Showing posts with label fall. Show all posts

Friday, October 31, 2014

Fall Thank You for Teachers

Today, I wanted to share with you the Fall Thank You I sent to my son's teachers.   These are cute post it note holders with a fall theme.  I give these out often to not only teachers, but friends and family.


For the chevron background I used Stampin Up's "Positively Chevron" Background Stamp in Versa Mark Ink and Clear Embossed it.  The fall leaves are from a retired set from Stampin Up called, "Gently Falling".

I colored the leaves with distress inks and was pleased with how they turned out for my first try at using them.

I personalized the back with a punched out heart and stamped Bryan with Lawn Fawn's "Violet ABC's".


Super simple thank you for almost anyone.  If you missed my post yesterday for the Halloween Treat Bags stop by here.

Happy crafting,
Melanie

Thursday, October 30, 2014

Class Halloween Treat Bags


Happy Halloween!  I have missed my craft room terribly, but I have found my way back to make my son's Halloween Treat Bags for school.

Here is how I made them:

I used treat bags from the Dollar Tree, they came 40 for $1.  Can't beat that deal.  I then used the Top Note retired die from Stampin Up for the topper of my bag.  I wanted to give that some glimmer so I sprayed it with shimmer paint.  The Witches Hat is from another retired Stampin Up set, "Wicked Cool".  I stamped in black clear embossed to give it some more shine and texture.    I punched an oval and embossed it with the dots folder.  If  you look close you can see that I actually used the back side.  The "BOO" sentiment, which I changed to "EEK!" later on is Lawn Fawn's Violet ABC's.

I folded the treat bag over and stapled the banner and topper.  I then covered that up with the Witches Hat and oval punch with foam dots.


For the back I stamped my son's name Bryan on the back the the Lawn Fawn Violet ABC's.  I am getting a lot of use out of that set already.


I hope you enjoyed and it in spires you to do your own.

Happy Crafting,

Melanie


Wednesday, October 30, 2013

Creepy Crawly Halloween Teacher Favor


Do you ever wonder what to do with those cute little sticky note pads that you see in the $1 at your favorite store?  Well, I just love to give them for gifts or favors.  This year I found some really cute Halloween ones at my Target store and I knew they would make the perfect little gift for my son's teachers.

I cut the craft card stock 3 1/4" x 6 5/8" and then scored at 3 1/4 from both edges.  These dimension might vary depending on the sticky note pad, so always measure twice and cut once.  Then I just adorned the front with some layered paper and the retired Stampin Up set, "Batty for You".


For the packaging, I used a clear bag and topped it off with embossed craft paper.  I cut the topper using Stampin Up's, "Labels Collection" framelits.


Great quick gift for those you want to know you appreciate them.  If you are looking for more ideas you can stop by and see what I did for the teachers last year, Click Here.
Happy Crafting,

Melanie

Wednesday, October 31, 2012

Trick-or-Treat Halloween Favors

I wanted to share with you today the Fall / Halloween treat bags that I made for my son's kindergarten class.  This simple topper is made with all Stampin Up products.  

I used the Top Note die and the retired "On the Spot" background and "Autumn Harvest" stamps.  I colored in the pumpkin with my AD markers from architecture school.  I was happy I found a good use for them.


For the teachers, I wanted to do something a little different.  I got this idea from my up line Brandy Cox at Brandy's Cards.  She has a great video tutorial on how to make these cute pumpkins.  They are great for Halloween, but also for Thanksgiving.


If you would like to check out my treats from last Fall / Halloween click here.

I hope everyone has a safe Halloween,

Melanie


Monday, November 14, 2011

Fantabulous Cricut Crawl - Harvest Blessings


Hi everyone and welcome to Melanie Makes and the Fantabulous Cricut Harvest Blessings Crawl...Fantabulous Cricut's version of a blog hop!  This is my first Crawl with FCCB's DT and I am blessed to by a part of it.


It's Fall and everyone at Fantabulous Cricut has decided to create projects to give thanks for our Harvest Blessings!   Each Design Team member will be featuring an original Fall project that includes BrownOrange and Red – along with at least one Cricut cut.

If you've come from visiting Marlene at Scrappin Cookie, you're in the right place! If you've just happened across my blog and would like to play along with our Fantabulous Cricut Crawl, start HERE .
Make sure to check out each DT member's blog for some awesome inspiration! There will be PRIZES along the way at some of our DT members' blogs, AND there will be a Grand Prize up for grabs at FCCB for one participant that submits a "Harvest Blessings" project at FCCB!


For my project I created a "Thankful" sign  as part of my dining room centerpiece.  The Thankful is in front of some pumpkins that I welded using my Gypsy then I added the cute little turkeys from Create-a-Critter to either end.  This sign has many more possibilities besides a centerpiece, it could easily be adapted to the mantel or add some twine or raffia and it could be made into a hanging sign for your wall or door.

If you would like more inspiration for Harvest Blessing projects please check out an earlier post HERE.


Recipe:
Cartridges:  Create-a-Critter, B is for Boy & Gypsy Font
Assorted Cardstocks: red, oranges, browns & yellow
Stampin Up Chocolate Brown Ink
Charcoal Chalk Ink
Green wrapped floral wire
Adhesive
Foam Dots

If you like what you see I would love for you to become a follower, so I can share my creations and ideas with you.

Now it's your turn! Let's see your Harvest Blessings projects!  Make sure to include a Cricut cut somewhere on your project and be sure to use the colours BrownOrange and Red as well!

Next stop… Melissa's blog, at Create with the Cricutkateer .  Go and see what she has in store for you today.  And when you're done, make sure to link up your project to FCCB's Fantabulous Cricut Crawl post to be entered into the contest!
Happy Crawling!

Melanie
__________________

Melanie – http://melaniemakes.blogspot.com/ <== You are here
Melissa – http://cricutkateer.blogspot.com/  <== Up Next


Thursday, October 27, 2011

Fall Harvest Party Treats

Hi everyone,
I hope many of you are enjoying the beautiful weather and colorful trees.  I know I have been stuck in the house this week with my oldest being sick, so when we drove to school today I really enjoyed the colorful scenery.

Today is my son's Fall Harvest party at preschool and I wanted to share with you the treat bags that I made for the children.  I think they are going to love them, I know I loved making them.


Recipe:
Stampin Up Top Note Die
Stampin Up Autumn Harvest stamp set
Studio G Alphabet stamp set
Staz On Ink
Stampin Up Chocolate Chip Ink
White Card Stock
Kraft Brown Card Stock
Orange Card Stock
AD Markers
1 1/2" Circle Punch
1 3/4" Circle Punch
2 3/8" Scallop Punch
Adhesive

Enjoy your day,
Melanie

Friday, October 21, 2011

Inking It Up Crazy Design Team Post - Halloween Treats

Today's post for the Inking It Up Crazy is Design Team was to create Some Halloween Treats.  I decided to make some party favors and cupcake toppers.

To make the cupcake toppers and the party favors I used the 2" scallop punch, 1 3/4" circle punch, 1 1/2" circle punch & the Stampin Up "Batty for You" stamp set.  I used an extra scallop punch on the party favors to conceal the back part of the favor.  Overall this is a really quick project, the longest part was filling the celo bags with candy.


I hope this inspires you to make some of your own tasty Halloween treats.  Be sure to stop by and check out what the other ladies have come up with on Inking It Up Crazy.
Have a great weekend,
Melanie

Monday, October 10, 2011

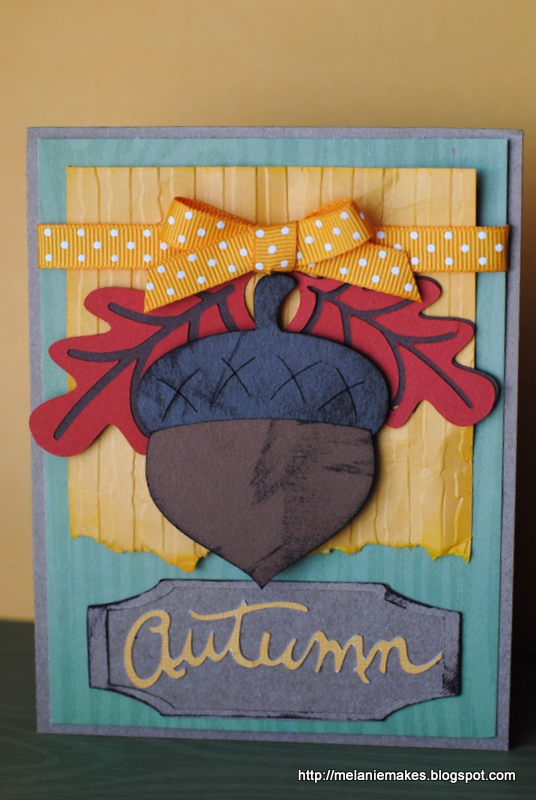
Falling for Autumn


This Fall card was inspired by some acorns my son collected in a park behind our house.  He just had a ball picking them up and throwing them into a lake.  We even took some home for hours a more fun with a dump truck.

With the acorn inspiration in hand, I was off to create this card.  Here is the recipe:
Cuts:
Acorn; 2.75" from "B is for Boy"
Leaves; 2" & 1.75" from "B is for Boy"
Autumn; 3.5" from "Stretch Your Imagination"
Frame Base; 3.5" x 1.25" (sized using Gypsy) from "Gypsy Wanderings"
Frame Outline; 3.5" x 1.25" (sized using Gypsy) from "Gypsy Wanderings"
Tools:
Cuttlebug; "Distressed Stripes" 
Materials:
Kraft Brown Card Stock (11"x4.25" folded in half)
Kraft Brown Card Stock
Brown Card Stocks
Yellow / Orange Card Stock (3.75" x 3.5")
Orange Paper
Green Pattern Paper (4" x 5.25")
Yellow poka dot ribbon
Stampin Up Chocolate Brown Ink

Cut the list of cuts above in desired card stock and assemble pieces.  Fold 11"x4.25" card base in half.  Cut a 4" x 5.25  piece of pattern paper and 3.75" x 3.5" of  orange / yellow card stock.  This last piece will need to be embossed with "Distressed Stripes", rip the bottom off and then crumpled into a ball for additional texture.  Adhere these layers together and tie ribbon towards the top of  the card.  Adhere this to the card base and now it time to start layering all the elements.  The acorn and the Autumn frame edges were inked.  The acorn was popped up with foam adhesive.  Lastly, I place the bow over where the leaves connect.  Voila, a cute Autumn card!


I hope you enjoyed this card, it is one of my Fall  favorites.  I am entering this into the My Craft Spot Design Team search.  Clink the link to check it out or even audition yourself.
Have a great week,
Melanie

Thursday, September 15, 2011

Inking It Up Crazy Design Team - Least Used Catridge

The challenge for this weeks Inking It Up Crazy Design Team was fairly simple, to use our least used cartridge.  For me this was the "Stretch Your Imagination" cartridge which came with my Cricut Expression.  It actually has some great images for all occasion on it and I should really use it more often.

Here is a Fall card I made with it.


To create this I used my Gypsy and welded some simple shapes and the tree.  I cut out my layers and used the distressed stripes cuttlebug folder for the tree trunk.  Then I ran it through again ontop of the folder to flatten it out to make it more subtle.  I just love this time of year with the crisp cool mornings and of course some football.

Please check out what the other ladies have made for this challenge over at Inking It Up Crazy.
Melanie