Showing posts with label die. Show all posts

Friday, June 12, 2015

Many Thanks Repeated Background

Hello everyone,
It has been awhile since my last post, but I have gotten in some new supplies and I am on a roll.  Some of my new goodies are from My Favorite Things (MFT) and Simon Says Stamp (SSS0 in making this "Thanks" card.  Let me give you the details on how I made it.


For the card I knew I wanted to do a thanks background with all the thank you stamps sets that I had on my shelf.  I used SSS Thanks,  Stampin Up!'s Curly Cute, Express Yourself, and Made for You.  I am loving the new Stitched Circles dies from SSS.  These are great to give your card that little extra detail.  The show piece of the card is the Thanks cut out with  MFT Many Thanks die. The green glimmer paper give it a little sparkle to make it special.  Finally, I used some Stampin Up ribbon and the flower from the Itty Bitty Accents punch pack.


I hope you enjoyed this card and it inspires you to look through your thanks sentiments to create a unique background of your own.

Getting inky means we are having fun!
Happy Crafting,

Melanie


Wednesday, December 3, 2014

Snowing Christmas Blessings

There certainly is a chill in the air, so the perfect time to work on the snowy cards.  This Christmas card showcases many Simon Says Stamps products.  I just love the rolling stitched hills and snow falling background.
To create the blue panel, I first die cut the large rectangle from the "Bundle of Stitched Shapes" by Simon Says Stamp.  One top of that to create "snow" I used Texture Past and the "Falling Snow" Stencil also from Simon Says Stamp.


The focal point of the card was made with the "Village" dies and the "Stitched Slopes and Hills from SSS.  I added an evening glow to the back of the building with some light yellow card stock.  The Christmas Blessings sentiment is from the SSS "Christmas SSS101353" stamp set.


I hope you enjoyed this wintry scene. Can't wait to do more with this village set.
Happy Crafting,

Melanie


Monday, November 24, 2014

Merry & Bright Water Color

Merry and Bright and full of color.  I am really loving this trendy water color technique.  It brings back memories of when I took art lessons as a child.


Here are the details on how you can make this card.  For the water color background, I spread  Peacock Feathers Distress Inks on my craft mat and spritzed with water.  I then placed my cardstock into the ink and let it absorb. I after several dabs I turned over and let the water do the work. 

Next, I used the large rectangle from the "Bundle of Stitched Shapes" by Simon Says Stamps.  To add another layer of interest, I used Texture Past and the "Falling Snow" Stencil from Simon Says   The "Merry" Die from MFT is cut from glitter paper and the "&" is from Avery Elle', "We R Family" Die.  Finally I heat embossed the bright greeting from Avery Elle's "Holiday Fill In the Blank" stamp set.


Wow, I didn't realize that I used some many different company's products on this card.  I really love it and hope it inspires you to dig deep in your supplies.

Happy Crafting,
Melanie

Thursday, October 3, 2013

Have Yourself a Merry Little Christmas Series - Part Four

Welcome back to Part Four in the "Have Yourself a Merry Little Christmas" Series featuring Stampin Up's "Merry Little Christmas" in the 2013 Holiday Mini.


Today's post is very similar to yesterdays in the elements that I used.  This one is a little more festive and sparkly which is perfect for the Holiday.  I set the sentiment off with the snowflake from the Snow Flurry Bigz die and the Season of Style cut with an Apothecary Accent framelit.  For the background I used a sponge dauber and versa mark ink that I then heat embossed with red glitter embossing powder.  I really love the sparkle to set the tone for this card.


If you missed out on Part OnePart Two or Part Three of the "Have Yourself a Merry Little Christmas" series, please check them out for more inspiration on this stamp set.
Happy Crafting,
Melanie

Wednesday, October 2, 2013

Have Yourself a Merry Little Christmas Series - Part Three

Welcome back to Part Three in the "Have Yourself a Merry Little Christmas" Series featuring Stampin Up's "Merry Little Christmas" in the 2013 Holiday Mini.


In today's post, I am featuring a rustic card.  I set the sentiment off with the snowflake from the Snow Flurry Bigz die and the Season of Style cut with an Apothecary Accent framelit.  The wood grain embossed background adds the rustic feel.


If you missed out on Part One or Part Two of the "Have Yourself a Merry Little Christmas" series, please check them out for more inspiration on this stamp set.
Happy Crafting,
Melanie

Tuesday, October 1, 2013

Have Yourself a Merry Little Christmas Series - Part Two

Welcome back to Part Two in the "Have Yourself a Merry Little Chirstmas" Series featuring Stampin Up's "Merry Little Christmas" in the 2013 Holiday Mini.

For today's project we are featuring a festive wine bottle tag.  This tag would be easy to create on your own, but I used Papertrey Ink's "Wine Bottle Tag" die.  A modification of this was also show in the card created in yesterday's Part One of the "Have Yourself a Merry Little Chirstmas" series.  Please check it out.


The other stamp set in the background is one of my favorites from the "Everything Eleanor" stamp set and the the Labels collection framelits on top with a touch of the Season of Style DSP.


I hope you enjoyed this project and please come back tomorrow for Part 3 in the series.
Happy Crafting,

Melanie

Monday, September 30, 2013

Have Yourself a Merry Little Christmas Series - Part One


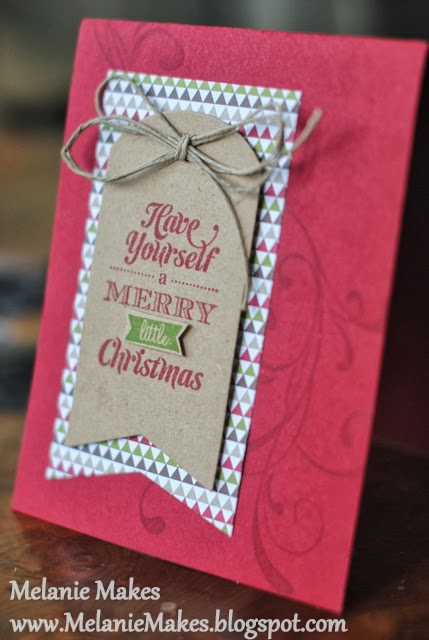
Looking for inspiration using the "Merry Little Christmas" stamp set from Stampin Up's 2013 Holiday Mini catalog?   I really fell in love with this set and have created several projects to help inspire you this holiday season.  Today's project is this beautiful Christmas card.


This Christmas card features the very popular banner style with Stampin Up's Season of Style designer series paper, Merry Little Christmas and Everything Eleanor stamp sets.  The larger banner was cut using Papertrey Ink's Wine Bottle Tag Die, with the top portion cut at score line.  The smaller banner was cut from another Papertrey Ink Die called, Tag Sale #5.  They layer and compliment each other really well.  This could easily be cut out if you don't have the dies.  I added a little bit of hemp twine to top it all off.
  

I hope you enjoyed Part One of the "Merry Little Christmas" series and please come back tomorrow to see the next project.
Happy Crafting,

Melanie


Thursday, September 19, 2013

Masculine Thinking of You

I really have been enjoying the "Sweet Essentials" stamp set from Stampin Up.  I just love the font!  Here is a card I was inspired from a Stampin Up post.  It was awhile back, but I thought I would try my take at it.  This is my masculine version of a birthday, thinking of you card.  


I used a window frame framelit that I cut in half and the cheveron is from the Tasteful Trim die.


Hope you enjoy and as always Happy Crafting,
Melanie

Wednesday, September 18, 2013

Banner Butterfly Trio

Welcome to the butterfly trio of cards.  I took a simple sketch to start the basis for my three designed.  I used the large banner as in beautiful blue paper adorned with butterflies.  The butterflies seen here are done with Stampin Up punches.  They are a great "go to" for cards, because who doesn't like butterflies.
  

Another great thing about these cards is that you could pair it with almost any sentiment; birthday, anniversary, sympathy or congratulations.

Here are a few more close ups:


Happy Crafting,
Melanie

Thursday, February 14, 2013

Valentine Treats for Teacher

Yesterday, I shared with you the Valentine's my boys helps make for their classmates.  Click here to view them.  Today, I will show you what we made for their teachers.


These treat boxes were made with the Matchbox Die from Stampin Up.  I was so excited to get this when it went on their clearance rack recently.  I also used the new "Hearts a Fluttuer" stamp set and the "Mixed Medley" stamp set to finish it off.


I hope the teachers enjoy them, I know I would love to receive this:)

Happy Valentine's Day,
Melanie

Wednesday, February 13, 2013

Valentine Treats for School

I wanted to share with you my latest craft exploration for Valentine's day.  Here are the Valentine's that my children and I made for their school friends.

For the girls, we made these flower valentine's with the Blossom Punch by Stampin Up and the Island Floral die.  The "friendship" center of this flower is from a retired stamp set called "Thinking Happy Thoughts".  I had my son practice typing his friends names on the computer and we printed out the To and From banners.  


For the boys, we made these gear shaped valentines.  We used the Basket and Blooms die along with the "Circle Circus" stamp set.


I really enjoyed spending time making in these with my boys.  They always love to use the big shot and help stamp.  

Happy Crafting,
Melanie


Saturday, January 5, 2013

Teacher Gift - Winter Wonder

I wanted to share with you the Teacher Gift's that we gave my son's teachers.  My inspiration started from the dollar bin at Michaels.  I picked up monogrammed black and white list pads that came with a matching pen.  From there I used my imagination and some Christmas stamps and dies from Stampin Up.  

I made the cover from black card stock and layer on top of that.  There are many videos on creating the cover on YouTube if you are interested.  I used the Snowflake Soiree stamp to clear emboss on the background paper.  Then I added this black and white polka dot card stock that I cut with a framelit and to top it off I added a Snow Flurry Snowflake.  This was a new die featured in the Stampin Up Holdiay Mini.


To finish the gift off, I made coordinating cards to go with it.  I hope this project inspires you to create your own home made gifts.


Happy Crafting in the New Year,
Melanie

Wednesday, December 12, 2012

Primrose Snowflake

This card is another version of the card that I cased from Stamp with Heather.  I just love how the banners add extra detail and you can still stamp a sentiment at the bottom.

I used the Snow Flurry Die and the Bold Snowflake really make it pop.


For the snowflake, I used the Bold Snowflake stamp and the Snow Flurry snowflake die. 


Tuesday, December 11, 2012

Primerose Snow Flurry

This card is a card I cased from Stamp with Heather.  She is a Stampin Up Artisan winner and has great projects.

For this card, I decided to go for a more nontraditional Christmas color scheme.  I used Stampin Up's Primerose Petals.  I really love the soft feel this gives the card.  The Snow Flurry die accents the embossed snowflake banners in the background.  Very simple and easy to create.


Happy Crafting,

Melanie

Friday, December 7, 2012

Winter Snow Flurry Christmas Card


This is another Winter Snowy Christmas Card and I just love how this turned out.  This is another version of the card that I posted yesterday
 

This was also created with the Snow Flurry die from Stampin Up, Woodgrain embossing folder and the Bold Snowflake.  The Bold Snowflake was is one of Stampin Up's new single stamps that coordinates with the Blossom Punch.  To finish off the card I used some Cherry Cobbler twine.


Enjoy your Christmas Crafting,
Melanie


Thursday, December 6, 2012

Snowy Seasons Greetings


 I am enjoying getting into the Christmas Spirit and started making some Christmas Cards for family and friends.  This one was created with the Snow Flurry die from Stampin Up and the Woodgrain embossing folder.  Both of the are new and can be found in the Stampin Up Holiday Catalog.

I will be showing you another Christmas card using the Snow Flurry die tomorrow.
Happy Crafting,

Melanie


Thursday, November 29, 2012

Children's Ornaments Series, Part Two - Sparkly Snowflake

Welcome back for Part Two of my Children's Ornament series.  If you missed my post from yesterday with the Poinsettia Ornament, come check it out here.  Today's ornament is just as easy to assemble and another wonderful ornament craft to do with your children.


This Sparkly Snowflake was made with two Stampin Up Snowflake dies.  One is a retired die Snowflake #2 and the other is in this year's Holiday Mini Catalog, Snow Flurry die.  I used layers of white fun foam alternated with glitter paper.  These layers are held together with a rhinestone brad. 


This ornament is also available in an ornament kit, please come check out my Etsy store, Melanie Makes.  This would make a great gift, stocking stuffer or activity for a play date.


Thanks for stopping by,

Melanie