Showing posts with label Christmas. Show all posts

Wednesday, December 6, 2017

Dollar Tree Fleece Infinity Scarf Tutorial

 My local dollar tree, had these fabulous buffalo plaid fleece scarfs.   I knew I wanted to do something crafty with them. I originally thought it was going to make a pillow, but the fabric was a little narrow.  I stared to think of other ideas and an infinity scarf came to mind.  It turned out great and I am nice and cozy with it on.

Here is how you make it:

1.  Cut yarn  ends off and square up the fleece fabric


2. Fold and pin fleece fabric with right sides together and sew a 1/4" seam


4. Tun inside out


5. Wear


This is was a super simple and quick project that you or your recipient will love.  I can't wait to make a few more and maybe need to take another trip to the Dollar Tree.
Happy Crafting!
Melanie

Tuesday, November 17, 2015

Prancing through the Snow!

YIt's almost that time of year and I have begun making Christmas Cards for family and friends.  I have been getting new supplies this past couple week and this is my first card.  I used several of Tim Holtz's BigZ Dies from Sizzix.  Love them!


I started off the card with a Stampin Up! Pear Pizzaz card stock card base.  I used Tim Holtz's "Holiday Knot" Embossing folder to create the sweater background.  On top of that I die cut a snowflake from Tim Holtz's Bigz die "Layered Snowflake" and a deer from the "Prancing Deer" die.  


The gold foil "Joy" die cut is from Stampin Up!'s "Wonderful Wreath" framelits.

Finally, I added some burlap ribbon and a thin strip of gold foil and some sequins to finish off the card.  

I really love the Bigz dies because you can cut through multiple pieces of card stock which is a time saver and very helpful when mass producing cards.


Hope this inspires your own Prancing Deer card!

Happy Crafting,

Melanie

Wednesday, December 3, 2014

Snowing Christmas Blessings

There certainly is a chill in the air, so the perfect time to work on the snowy cards.  This Christmas card showcases many Simon Says Stamps products.  I just love the rolling stitched hills and snow falling background.
To create the blue panel, I first die cut the large rectangle from the "Bundle of Stitched Shapes" by Simon Says Stamp.  One top of that to create "snow" I used Texture Past and the "Falling Snow" Stencil also from Simon Says Stamp.


The focal point of the card was made with the "Village" dies and the "Stitched Slopes and Hills from SSS.  I added an evening glow to the back of the building with some light yellow card stock.  The Christmas Blessings sentiment is from the SSS "Christmas SSS101353" stamp set.


I hope you enjoyed this wintry scene. Can't wait to do more with this village set.
Happy Crafting,

Melanie


Monday, November 24, 2014

Merry & Bright Water Color

Merry and Bright and full of color.  I am really loving this trendy water color technique.  It brings back memories of when I took art lessons as a child.


Here are the details on how you can make this card.  For the water color background, I spread  Peacock Feathers Distress Inks on my craft mat and spritzed with water.  I then placed my cardstock into the ink and let it absorb. I after several dabs I turned over and let the water do the work. 

Next, I used the large rectangle from the "Bundle of Stitched Shapes" by Simon Says Stamps.  To add another layer of interest, I used Texture Past and the "Falling Snow" Stencil from Simon Says   The "Merry" Die from MFT is cut from glitter paper and the "&" is from Avery Elle', "We R Family" Die.  Finally I heat embossed the bright greeting from Avery Elle's "Holiday Fill In the Blank" stamp set.


Wow, I didn't realize that I used some many different company's products on this card.  I really love it and hope it inspires you to dig deep in your supplies.

Happy Crafting,
Melanie

Friday, October 4, 2013

Have Yourself a Merry Little Christmas Series - Part Five

Welcome back to Part Five in the "Have Yourself a Merry Little Christmas" Series featuring Stampin Up's "Merry Little Christmas" in the 2013 Holiday Mini.


Today's is the final post in series and I have sure had fun creating with this set.  For this card I features the "Merry Little Christmas" stamp set along with the "Beautifully Baroque" set that is new in the catalog this year.  The background is stamped with the Beautifully Baroque set in Versa Mark ink.  I then stamped a craft brown piece of card stock and cut in out with the Window Frame framelit.  Added some bakers twine, faceted button and ribbon to finish it off.


If you missed out on Part OnePart Two, Part Three or Part Four of the "Have Yourself a Merry Little Christmas" series, please check them out for more inspiration on this stamp set.
Happy Crafting,
Melanie

Monday, September 30, 2013

Have Yourself a Merry Little Christmas Series - Part One


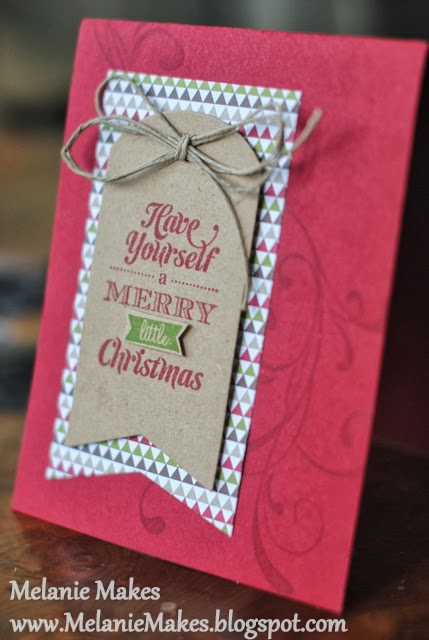
Looking for inspiration using the "Merry Little Christmas" stamp set from Stampin Up's 2013 Holiday Mini catalog?   I really fell in love with this set and have created several projects to help inspire you this holiday season.  Today's project is this beautiful Christmas card.


This Christmas card features the very popular banner style with Stampin Up's Season of Style designer series paper, Merry Little Christmas and Everything Eleanor stamp sets.  The larger banner was cut using Papertrey Ink's Wine Bottle Tag Die, with the top portion cut at score line.  The smaller banner was cut from another Papertrey Ink Die called, Tag Sale #5.  They layer and compliment each other really well.  This could easily be cut out if you don't have the dies.  I added a little bit of hemp twine to top it all off.
  

I hope you enjoyed Part One of the "Merry Little Christmas" series and please come back tomorrow to see the next project.
Happy Crafting,

Melanie


Wednesday, August 7, 2013

Textured Beautifully Baroque Merry Christmas

For today's Christmas card, we took a slightly different take on the ornament that we cut out from Stampin Up's "Beautifully Baroque" stamp set.  If you missed my two previous Christmas card posts using this stamp please check them out; Beautifully Baroque Seasons Greetings and Beautifully Baroque Christmas Cheer.


For this card and my previous card I cut out the ornament shape from the "Beautifully Baroque" stamp.  I used the curly stamp from "Everything Elenor" to set the background and the embossed with a writing embossing folder.  I used the "Merry" from "Teeny Tiny Wishes" stamp set along with the coordinating punch.


I hope you enjoyed this series using the Beautifully Baroque stamp set.  I can't wait to create more using it.

Happy Crafting,
Melanie

Monday, August 5, 2013

Beautifully Baroque Seasons Greetings

It seems like the summer has really snuck past me this year, so I am already starting to make some Christmas cards for friends and family.  I always like to come up with inventive ways to use my stamps.  For this card I used the new "Beautifully Baroque" stamp set from Stampin Up.  


Here is how I made the layered scallops.  I first stamped the image and then cut the image in half.  Then using 1 3/4" circle punch I followed the curved line to punch around.  I layered them up and added some satin ribbon.  


This could really be a universal card for any occasion  by changing the sentiment and colors.  I hope this inspires you to use your stamps in new ways.  

Happy Crafting,
Melanie

Friday, January 4, 2013

Everything Eleanor Christmas - Part Four


I know it is after Christmas, but I still wanted to share this card with you.  This is my final card of my personal challenge in using a non tradition stamp set to create Christmas cards.  I really enjoyed using the Everything Eleanor stamp set from Stampin Up.  This is the one that I choose to mass produce.  Simple and elegant, just the way I like it.


Happy New Year,
Melanie


Thursday, December 20, 2012

Everything Eleanor Christmas - Part Three

This is my third card of my personal challenge in using a non tradition stamp set to create Christmas cards.  Everything Eleanor stamp set from Stampin Up can really produce many different looks.  I also used the Al la Cart, "Bold Snowflake".  This color scheme features Baja Breeze and Lucky Limeade.  


Merry Christmas,
Melanie

Wednesday, December 19, 2012

Everything Eleanor Christmas - Part Two

 This is my second card of my personal challenge in using a non tradition stamp set to create Christmas cards.  I really enjoyed using the Everything Eleanor stamp set from Stampin Up.  I also used the new woodgrain embossing folder featured in the Holiday Mini.


Merry Christmas,
Melanie

Monday, December 17, 2012

Everything Eleanor Chirstmas - Part One


I decided to challenge myself and try something new, use a none Christmas stamp set to create Christmas cards.  For this challenge I used the Everything Eleanor stamp set from Stampin Up.

This is the most simple card I created with the stamp set.  The most time consuming part is cutting the red accent piece in the background.  That didn't take too long, so I could see this as being easily mass produced.


The center snowflake is done with a retired Stampin Up snowflake punch.


Please come back tomorrow and check out another Christmas card using this stamp set.  
Thanks for stopping by,
Melanie

Wednesday, December 12, 2012

Primrose Snowflake

This card is another version of the card that I cased from Stamp with Heather.  I just love how the banners add extra detail and you can still stamp a sentiment at the bottom.

I used the Snow Flurry Die and the Bold Snowflake really make it pop.


For the snowflake, I used the Bold Snowflake stamp and the Snow Flurry snowflake die. 


Tuesday, December 11, 2012

Primerose Snow Flurry

This card is a card I cased from Stamp with Heather.  She is a Stampin Up Artisan winner and has great projects.

For this card, I decided to go for a more nontraditional Christmas color scheme.  I used Stampin Up's Primerose Petals.  I really love the soft feel this gives the card.  The Snow Flurry die accents the embossed snowflake banners in the background.  Very simple and easy to create.


Happy Crafting,

Melanie

Friday, December 7, 2012

Winter Snow Flurry Christmas Card


This is another Winter Snowy Christmas Card and I just love how this turned out.  This is another version of the card that I posted yesterday
 

This was also created with the Snow Flurry die from Stampin Up, Woodgrain embossing folder and the Bold Snowflake.  The Bold Snowflake was is one of Stampin Up's new single stamps that coordinates with the Blossom Punch.  To finish off the card I used some Cherry Cobbler twine.


Enjoy your Christmas Crafting,
Melanie


Thursday, December 6, 2012

Snowy Seasons Greetings


 I am enjoying getting into the Christmas Spirit and started making some Christmas Cards for family and friends.  This one was created with the Snow Flurry die from Stampin Up and the Woodgrain embossing folder.  Both of the are new and can be found in the Stampin Up Holiday Catalog.

I will be showing you another Christmas card using the Snow Flurry die tomorrow.
Happy Crafting,

Melanie


Sunday, December 2, 2012

Children's Ornament Series, Part Five - Rosette Snowflake Photo Ornament

Today is the final installment of my Children's Ornament Series and I have saved the best for last.  This is also the most difficult, but really is stunning.

Every year I create a photo ornament of my children to put on our tree, although my oldest is only 5 we already enjoy looking back at how each of them have grown.  I am especially excited this year because we get to add one for our newest addition, William.  Click here to see last year's photo ornament.


Again, I was inspired by my Stampin Up products in creating this ornament.  My Big Shot sure came in handy for this one.  Here are the Bigz Dies that I used:  Designer Rosette Die, Snowflake # 2 Die and the Snow Flurry Die.

I cut out the rosette from Very Vanilla cardstock, the Snowflake #2 was cut from Cherry Cobbler cardstock, and the Snow Flurry was cut from sparkly gold cardstock.  The patterned paper is retired DSP from Stamp Up, I got a great deal on it from the Clearance Rack.  Finally the stamp set I used the Hostess Mixed Medley Stamp Set.  I really like it because it covers all the Holidays.


I hope I have inspired you to get crafting with your kids, it is such wonderful time spent share what you love.  Again, if you have missed any in this series please come check out the Poinsettia, Snowflake, Scalloped Christmas Tree and the Scalloped Gingerbread Man.  These are also available for purchase at my Etsy Store, Melanie Makes.

Make those special memories,

Melanie


Saturday, December 1, 2012

Children's Ornament Series, Part Four - Scalloped Gingerbread Man

In today's post of my Children's Ornament Series, we featured another cute scallop Gingerbread Man ornament.


We created this cute Gingerbread Man very similar to yesterday's Christmas Tree.  We  used many Stampin Up products including; the retired Scallop Circle #2 Bigz Die and the Secentsational Season Framelits featured in the Holiday Mini.  These were used to cut out the fun foam shapes.  The white scallop is cut out of the thicker 3/8" foam that they sell at Hobby Lobby.  To finish the ornament off, I also used Licky Limeaide Twine, Rhinestones and Gumball Green Stitched Ribbon.

If you missed the previous ornaments in this series please, check on the Poinsettia, Snowflake and Scalloped Christmas Tree here to see them.  These are also available for purchase at my Etsy Store, Melanie Makes.


Melanie