Wednesday, October 30, 2013

Creepy Crawly Halloween Teacher Favor


Do you ever wonder what to do with those cute little sticky note pads that you see in the $1 at your favorite store?  Well, I just love to give them for gifts or favors.  This year I found some really cute Halloween ones at my Target store and I knew they would make the perfect little gift for my son's teachers.

I cut the craft card stock 3 1/4" x 6 5/8" and then scored at 3 1/4 from both edges.  These dimension might vary depending on the sticky note pad, so always measure twice and cut once.  Then I just adorned the front with some layered paper and the retired Stampin Up set, "Batty for You".


For the packaging, I used a clear bag and topped it off with embossed craft paper.  I cut the topper using Stampin Up's, "Labels Collection" framelits.


Great quick gift for those you want to know you appreciate them.  If you are looking for more ideas you can stop by and see what I did for the teachers last year, Click Here.
Happy Crafting,

Melanie

Saturday, October 26, 2013

Driving Me Batty


This year is the year of the Bat in my family and my three sons are going to play the part.  
I love to do simple sewing and this really fits the bill, because with three boys you know there isn't a lot of free time.  This cute design is from Alpha Mom website, you can visit her site to download a PDF of the steps. 

 I made a different mask which I got from Blog 5 to 9.  


Together, they make the perfect bat.  As far as time, this only took me about an hour.  The second costume went even faster. Need something
quick and easy, look no further. 


Happy Crafting.
Melanie

Friday, October 4, 2013

Have Yourself a Merry Little Christmas Series - Part Five

Welcome back to Part Five in the "Have Yourself a Merry Little Christmas" Series featuring Stampin Up's "Merry Little Christmas" in the 2013 Holiday Mini.


Today's is the final post in series and I have sure had fun creating with this set.  For this card I features the "Merry Little Christmas" stamp set along with the "Beautifully Baroque" set that is new in the catalog this year.  The background is stamped with the Beautifully Baroque set in Versa Mark ink.  I then stamped a craft brown piece of card stock and cut in out with the Window Frame framelit.  Added some bakers twine, faceted button and ribbon to finish it off.


If you missed out on Part OnePart Two, Part Three or Part Four of the "Have Yourself a Merry Little Christmas" series, please check them out for more inspiration on this stamp set.
Happy Crafting,
Melanie

Thursday, October 3, 2013

Have Yourself a Merry Little Christmas Series - Part Four

Welcome back to Part Four in the "Have Yourself a Merry Little Christmas" Series featuring Stampin Up's "Merry Little Christmas" in the 2013 Holiday Mini.


Today's post is very similar to yesterdays in the elements that I used.  This one is a little more festive and sparkly which is perfect for the Holiday.  I set the sentiment off with the snowflake from the Snow Flurry Bigz die and the Season of Style cut with an Apothecary Accent framelit.  For the background I used a sponge dauber and versa mark ink that I then heat embossed with red glitter embossing powder.  I really love the sparkle to set the tone for this card.


If you missed out on Part OnePart Two or Part Three of the "Have Yourself a Merry Little Christmas" series, please check them out for more inspiration on this stamp set.
Happy Crafting,
Melanie

Wednesday, October 2, 2013

Have Yourself a Merry Little Christmas Series - Part Three

Welcome back to Part Three in the "Have Yourself a Merry Little Christmas" Series featuring Stampin Up's "Merry Little Christmas" in the 2013 Holiday Mini.


In today's post, I am featuring a rustic card.  I set the sentiment off with the snowflake from the Snow Flurry Bigz die and the Season of Style cut with an Apothecary Accent framelit.  The wood grain embossed background adds the rustic feel.


If you missed out on Part One or Part Two of the "Have Yourself a Merry Little Christmas" series, please check them out for more inspiration on this stamp set.
Happy Crafting,
Melanie

Tuesday, October 1, 2013

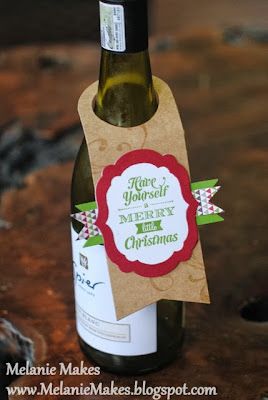
Have Yourself a Merry Little Christmas Series - Part Two

Welcome back to Part Two in the "Have Yourself a Merry Little Chirstmas" Series featuring Stampin Up's "Merry Little Christmas" in the 2013 Holiday Mini.

For today's project we are featuring a festive wine bottle tag.  This tag would be easy to create on your own, but I used Papertrey Ink's "Wine Bottle Tag" die.  A modification of this was also show in the card created in yesterday's Part One of the "Have Yourself a Merry Little Chirstmas" series.  Please check it out.


The other stamp set in the background is one of my favorites from the "Everything Eleanor" stamp set and the the Labels collection framelits on top with a touch of the Season of Style DSP.


I hope you enjoyed this project and please come back tomorrow for Part 3 in the series.
Happy Crafting,

Melanie