Monday, October 31, 2011

Fantabulous Cricut Challenge Blog Design Team

Hi everyone,
I wanted to let you in on some exciting news, I am a new member of the Fantabulous Cricut Challenge Blog Design Team!  My first project for the Design Team with be post next Wednesday, November 7th.  I am so looking forward to sharing my projects with people and hope it inspire some of you.

If you don't follow Fantabulous Cricut Challenge Blog you should go check it out they have great daily inspiration which includes: Challenge Me Mondays, Quick Tip Tuesdays,  Wednesday's Winners, Thursday's Tutorials, Fantabulous Fridays, Scrapin Saturday & Spotlight Sunday.

Have a safe and Happy Halloween,
Melanie

Thursday, October 27, 2011

Fall Harvest Party Treats

Hi everyone,
I hope many of you are enjoying the beautiful weather and colorful trees.  I know I have been stuck in the house this week with my oldest being sick, so when we drove to school today I really enjoyed the colorful scenery.

Today is my son's Fall Harvest party at preschool and I wanted to share with you the treat bags that I made for the children.  I think they are going to love them, I know I loved making them.


Recipe:
Stampin Up Top Note Die
Stampin Up Autumn Harvest stamp set
Studio G Alphabet stamp set
Staz On Ink
Stampin Up Chocolate Chip Ink
White Card Stock
Kraft Brown Card Stock
Orange Card Stock
AD Markers
1 1/2" Circle Punch
1 3/4" Circle Punch
2 3/8" Scallop Punch
Adhesive

Enjoy your day,
Melanie

Friday, October 21, 2011

Inking It Up Crazy Design Team Post - Halloween Treats

Today's post for the Inking It Up Crazy is Design Team was to create Some Halloween Treats.  I decided to make some party favors and cupcake toppers.

To make the cupcake toppers and the party favors I used the 2" scallop punch, 1 3/4" circle punch, 1 1/2" circle punch & the Stampin Up "Batty for You" stamp set.  I used an extra scallop punch on the party favors to conceal the back part of the favor.  Overall this is a really quick project, the longest part was filling the celo bags with candy.


I hope this inspires you to make some of your own tasty Halloween treats.  Be sure to stop by and check out what the other ladies have come up with on Inking It Up Crazy.
Have a great weekend,
Melanie

Thursday, October 13, 2011

It's All about Baby!


This post is all about Babies, I am going to a friend's baby shower this weekend and it put me in that kind of mood.  I really love making banners, since they go together really quickly.

I used the same template I created for my parent's anniversary banner.  This scallop shape is really versatile.  I created it using my Gypsy.  In making the banner, I used the Accent Essentials, B is for Boy and the Songbird cartridges.


I hope this inspires some banner making.

Melanie

Monday, October 10, 2011

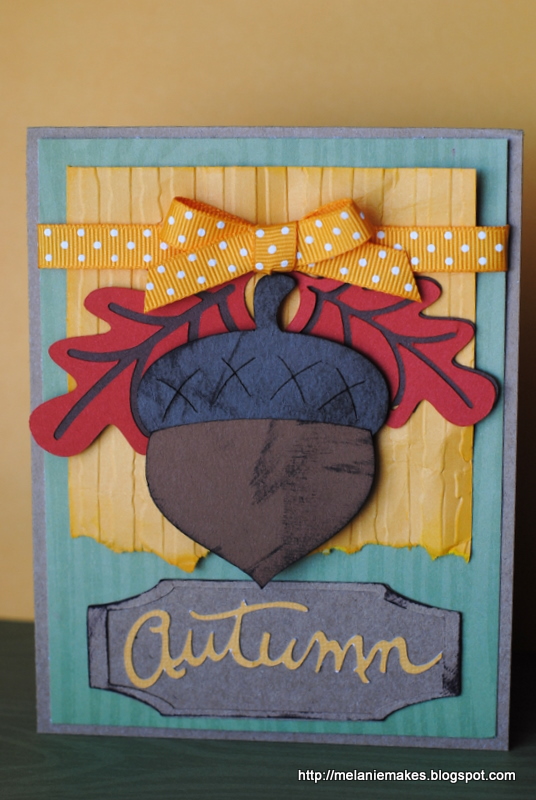
Falling for Autumn


This Fall card was inspired by some acorns my son collected in a park behind our house.  He just had a ball picking them up and throwing them into a lake.  We even took some home for hours a more fun with a dump truck.

With the acorn inspiration in hand, I was off to create this card.  Here is the recipe:
Cuts:
Acorn; 2.75" from "B is for Boy"
Leaves; 2" & 1.75" from "B is for Boy"
Autumn; 3.5" from "Stretch Your Imagination"
Frame Base; 3.5" x 1.25" (sized using Gypsy) from "Gypsy Wanderings"
Frame Outline; 3.5" x 1.25" (sized using Gypsy) from "Gypsy Wanderings"
Tools:
Cuttlebug; "Distressed Stripes" 
Materials:
Kraft Brown Card Stock (11"x4.25" folded in half)
Kraft Brown Card Stock
Brown Card Stocks
Yellow / Orange Card Stock (3.75" x 3.5")
Orange Paper
Green Pattern Paper (4" x 5.25")
Yellow poka dot ribbon
Stampin Up Chocolate Brown Ink

Cut the list of cuts above in desired card stock and assemble pieces.  Fold 11"x4.25" card base in half.  Cut a 4" x 5.25  piece of pattern paper and 3.75" x 3.5" of  orange / yellow card stock.  This last piece will need to be embossed with "Distressed Stripes", rip the bottom off and then crumpled into a ball for additional texture.  Adhere these layers together and tie ribbon towards the top of  the card.  Adhere this to the card base and now it time to start layering all the elements.  The acorn and the Autumn frame edges were inked.  The acorn was popped up with foam adhesive.  Lastly, I place the bow over where the leaves connect.  Voila, a cute Autumn card!


I hope you enjoyed this card, it is one of my Fall  favorites.  I am entering this into the My Craft Spot Design Team search.  Clink the link to check it out or even audition yourself.
Have a great week,
Melanie

Thursday, October 6, 2011

Inking It Up Crazy Design Team Post - “Cricutless” Challenge


Today is another Inking It Up Crazy Design Team Post and this one is the "Cricutless" Challenge.  I decided to use my favorite punches as the focal point.


The punches I used are the small and large Retro Flower Punches from EK Success.  I punched two large flowers, small scallop and two small flowers.  They are held together with a brad.  A scalloped border punch was used on the rectangular elements and birthday sentiment.  The pattern paper is DCWV and the sentiment is from "So Happy for You" from Stampin Up.


Please check out what the other ladies have made for this challenge over at Inking It Up Crazy.

Melanie

Sunday, October 2, 2011

Happy Holidays Ornament


I created this card for the My Pink Stamper's Christmas Card Challenge.  I used the Christmas Solutions cartridge that came on my Gypsy.

Here is how I made it:
The filigree Ornament is cut a 2.5".  I then used the Stampin Up, Baroque Motifs stamps set with Versa Mark Ink and silver embossing powder.  I then cut that out using the 2 1/4" circle punch.  The center was cut out with a 1" circle punch.  I layered that onto the ornament with a pop dot.  I am really enjoying working with the Christmas Solutions cartridge.  Check out the other Ornament Card I made with this cartridge and stamp set.


Thanks for stopping by,
Melanie