Showing posts with label cricut expression. Show all posts

Wednesday, July 20, 2011

My Pink Stamper Design Team 2011 Challenge

Well, it is that time to try out for My Pink Stamper's Design Team term that will be from August to January.  I have been using my Cricut Expression and Gypsy now for about 6 months.  I still really love creating with them both.

The design challenge : 

Make a card, scrapbook page, or other Cricut project with your favorite Cricut cartridge using the following colors......

Orange
Turquoise 
Green
Brown
(other optional color of your choice)

I decided to make a Welcome Baby card since I have several friends that are expecting new babies.  Making this type of card you can't help but smile.  It is just such a joyous and special occasion.  

Here is the recipe for my card:
Kraft Brown Card Base: 8.5" x 11" folded in half
White Card stock: 5" x 4"
Flower Circle Paper: 5" x 4"
Orange Circles cut at 1 1/8"
Blue Circles cut at 1"
Small 5/8" Circles punched
"Baby" cut from "B is for Boy" Cartridge at 3/4" from Brown card stock
Onesie cut from "B is for Boy" Cartridge at 3"
EK Success Scallop Diamond Punch
EK Success Scallop Trim Punch
Yellow cross stitch floss
Orange brads 

All specialty paper is from My Mind's Eye, "Where the Heart is" paper pack.


I hope you enjoyed my card and wish me luck on my submission.  Robyn is very talented designer who's video's are so entertaining.  I would really love to be a part of Robyn's team, she always surrounds herself with talented ladies.  

Have a great week,
Melanie


Friday, July 1, 2011

Happy 50th Anniversary - Part One


Well things are a bit hectic around here, we are preparing for my parent's 50th Anniversary Celebration this weekend.  This is such a milestone that my sister and I wanted to have a celebration with family and friends.  I have been busy making invitations, thank- you notes and decorations for the occasion.  My parent's colors for the wedding were periwinkle blue and there flowers were daisies.  I incorporated this into the anniversary theme.

The first thing I wanted to share with you is the invitation to the party.  It is a pretty simplistic card using craft brown, white, yellow and periwinkle blue card stocks.  I also used my Cricut to cut the two layers for daisy flower.  Of course, the picture is from their wedding day.  It is so hard to imagine my parents this young and makes me think if my boys are going to feel the same way about Matt and I someday?

I will post pictures from the festivities early in the week.  I hope everyone has a wonderful Holiday weekend!

Melanie

Friday, June 3, 2011

End of the Year Teacher Bouquet


I can't believe my son had his last day of preschool this week, the school year has really gone by quickly.  Now let's hope that I survive the summer with my two busy boys.
To thank Tyler's teacher and assistant, I made to gift card bouquets for each of them.  I got the idea from Disney Family Fun magazine.  I had other interested parents send me gift cards to include in the bouquet.  Here's how I made it:
I used the scalloped circle from "Accent Essentials" cartridge cut at 3.5" and the three flower layers are from "Plantin SchoolBook" cartridge, cut at 3", 2.75", 2.15".  I used a pencil to curl the edges up and used adhesive to stick the layers together.

The gift card envelope that the flowers are attached to is from the "Sweethearts" cartridge.  The dimensions are 7.15" wide x 3.30" high.  Once these were assembled, I attached the flowers that I made.

Finally, I attached the gift card flower envelopes to 18 gauge floral wire that I coiled at one end.  I maybe would get a little thicker gauge wire next time, some of them were a little top heavy.

I think any person would love to receive this special arrangement.  I hope this inspires some great ideas for you all, I am really enjoying these paper flowers.

Melanie


Friday, May 6, 2011

Teacher Appreciation Card

To go along with our Teacher Appreciation gift to Mrs. Heather, I made this simple card.  Nothing to fancy since I had only a little time to make it, but I am pleased with it. 

I used the Plantin Schoolbook cartridge for the Apple and the squigly line.  I typed up, "Mrs. Heather my Teacher" on our computer and printed it out on white card stock.

Have a good Mother's Day weekend!

Melanie 

Monday, May 2, 2011

Teacher Appreciation Gift

I still seem really swamped and not getting as much time to craft and blog as I would like.  I did however just finish this for Tyler's teacher appreciation gifts.  We did a similar project a Stamp Club class that I am taking with Angie Guy, a "Stampin Up" representative.  If any of my local friends want to come with me sometime just let me know.

As for the project, I took a small legal pad (8"x5") and added a decorative cover to it.  On white card stock, I printed "Thanks for all that you do".  This really could be changed to say anything.  Then I added some decorative paper that I punched the borders.  On top of that placed a flower that was cut and made with several layer from my cricut.  I am pleased with the end product and will sure to be making more.

Have a good week and thanks to all our teachers out there!

Melanie

Friday, March 4, 2011

Tyler's Fourth Birthday - Part One


Hi everyone - As I mentioned in my last post I was busy working on my son, Tyler's fourth birthday party invitations and decorations.  I have just completed the invitations and was very excitted to share with everyone.  Tyler wanted a Disney "Cars" theme and I just got the Cars cartridge on clearance from Michael's, so it worked out well.

When I sketching out the card I wanted to incorporate the western landscape as part of the invitation.  All my plans involved a great deal of work and since I was making more than a few I was getting discouraged, but then I looked up and had an epiphany of sorts.  When I looked up I was looking at several photos of our trip out west that we have on our wall.  I then thought that I could use on of those as the perfect backdrop for McQueen.  It took some searching, but I finally found a perfect one from when we were in Zion Nation Park.  It had the western feel and the road in perspective, couldn't scrapbook that any better than the real thing.  Next, I used the computer to add the text and printed it out on photo paper.  The Lighting Mcqueen is cut at 2 1/4" from the Pixar Cars Cricut cartridge.

For the back I used the computer again for the text and flag image.  Again, I printed it out onto photo paper.  Then I used the Pixar Cars Cricut cartridge again for the Piston Cup and McQueen cut outs.

The front and back were then adhered to an A2 size piece of yellow card stock.

A little time consuming, but I couldn't be more pleased with the way they turned out.  Next up will be the banner.  Tyler has wanted ever since he saw Bryan's first birthday banner.  I learned some things from making  his, so I am looking to seeing Tyler's.

Thanks for stopping by - Melanie

Friday, February 11, 2011

Spring is around the corner!

Alright, so we aren't quite at Spring yet.  I can hope though can't I?  I made this flower card for a My Pink Stamper Challenge.  I think with all the snow that they have gotten in OK they are ready for an early Spring.  Let's hope the ground hogs prediction is correct.

I made this flower card with the help of my wonderful Gypsy again.  I love that I can do so much more with the Expression and can design my own creations with it. 

The size for the scalloped card base is 4.25"  The layer on top of that is 4.25", I used my Gypsy to hid the interior layer.  The next layer is just the reverse of the previous layer.  These flowers were from the Accent Essentials cart.  The next flowers were cut from the Plantin Schoolbook cart.  First at 4" and the same flower cut twice at 3" each.  The center of the flower is from Create a Critter.  I again used my gypsy to turn of the center.  These were cut at 1.5" and 1.25".  To finish it off I used a button and sewed it to the paper with some cross stitch floss.  I also used my bone folder to slightly curl the petals. 

I can't wait to send this to someone, but meanwhile I will enjoy looking at in on my shelf. 
Here's to an early Spring!
Melanie

Thursday, February 10, 2011

Happy Birthday Present - Just 4 You

Here is a sweet little card that I made for my neighbors little girl, Paige.  She was born 3 days before my Tyler and they will both be 4 in mid-March.  We are very lucky to have children so close in age and most afternoons when the weather is nice you will find all of us all outside.

For this card I used my Gypsy to weld the presents into a card shape. The "Just 4 You" sentiment is from the Create a Critter cartridge.  I think this is one of my favorite cards this year. 

Have a good rest of the week - Melanie


Tuesday, February 1, 2011

Inching for Love Valentine


Since I have been making some Valentine for my husband and sons' I though the grandparents would like to receive one too.  I created this card with adorable little caterpillar with the saying, "Inching for Love". 
The cute caterpillar is from the Stretch Your Imagination cartridge.  I made my own little heart board with my Gypsy and the heart was from the Plantin Schoolbook.  I used the same heart for the background.  I used my computer to print out the "Inching for Love" sentiment.  I hope the grandparents will like them.


Have a good week!
Melanie

Monday, January 31, 2011

Hugs & Kisses - Valentine

Here is a cute card that I made for Tyler.  It has this adorable puppy and cat together under a heart filled tree.  He is special little man and I think he will like.  Let's hope he doesn't get any ideas about a dog quite yet. 

I made this card with the with the Paper Pups cartridge for the dog and cat cut at 3.5" and the Sweethearts cartridge for the tree, 3.75" and sentiment at 1.75".  I added some green ribbon to wrap in all together.
Enjoy,

Melanie


Saturday, January 29, 2011

Valentine's Card

Shhh everyone, I am posting my valentine's card to give my husband.  We have been married for 9 years now and have our two beautiful boys, Tyler (almost 4) and Bryan (one).  We aren't really big celebrators of this holiday, but we do enjoy giving each other a nice card with a personal message inside.  I thought this pull out card and card holder would be perfect for me to write a special note to him.

I didn't have any valentine paper so I decided that I would try to make some with my Cricut Color Inks.  I used my gypsy to fill a sheet of paper with hearts from the Sweethearts cartridge.  In the Gypsy I also modified the original card holder image.  I moved it over to the right to allow room for my "Love" sentiment on the side.  Next, I switched the blade back in and cut the card holder out.  The Gyspy was a great purchase for me and really allows me to be more creative with the Cricut.  There is no way I could have done this without it.  The "Love" sentiment was also from the Sweethearts cartridge and then I layered it on top of pink and read paper that I uses a corner punch on.

My husband doesn't really know what to make of this new hobby, but I hope he can enjoy the card. 
Melanie


Area to write a "Love" note

Wednesday, January 26, 2011

Happy Birthday Cupcake Card

I have been on a roll with creating some cards, especially birthday cards.  I have a nice little stash now.  Here is a little cupcake birthday card.  Yummy!  I used the cupcake from the Create a Critter cartridge and the Birthday sentiment is from Simply Sweet .  I hope everyone is enjoying their day!


Melanie

Tuesday, January 25, 2011

My Pink Stamper - Birthday Card Challenge

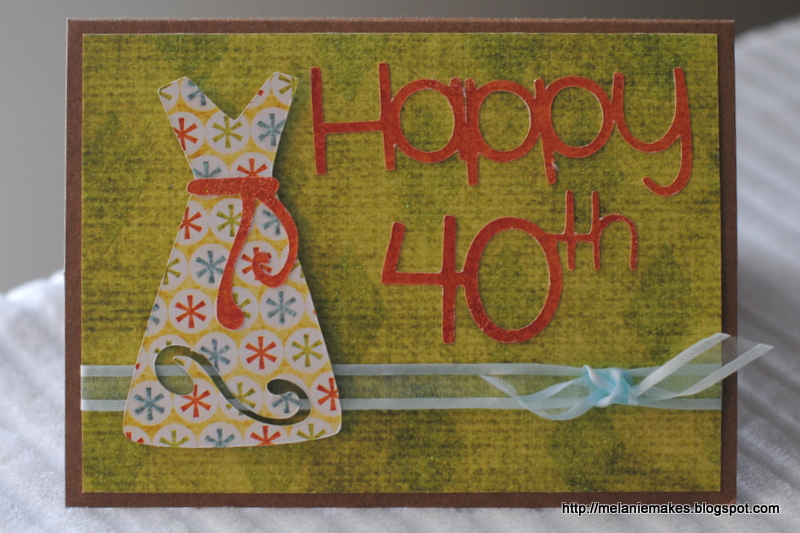
Here is my most recent challenge entry for My Pink Stamper and Robyn's birthday.  I have a special friend that will be turning the big 40, so I though what a perfect to make a special card for her.


I used the Gypsy Wanderings Dress cut out at 3" and the Happy 40th was welding from the Simply Sweet font.  I am looking forward to our celebration dinner and hope she enjoys her card.


Friday, January 21, 2011

Bryan's First Birthday Bash

Bryan's Birthday Invitation
This past weekend we celebrated Bryan's First Birthday with the family.  We are celebrating a little late, but we have found that having Christmas, our wedding anniversary, Bryan's birthday and New Years with in span of a week is challenging to say the least.

For Christmas, I received this great cartridge for my Cricut called "Create a Critter" and it has such adorable animals on it.  I knew I wanted to use if for Bryan's birthday and I decided to to a Jungle Safari theme staring this little monkey on the invitation.

For the party, I wanted to see what other things that I could make.  I decided it would be great to have a festive birthday banner for when my family came.  I added some additional safari animals as spacers in the banner.

Birthday Banner
I also made a little welcome arrangement with more of our safari friends.


What party wouldn't be complete without cake.  Here is the little smasher cake I made for Bryan.  I also thought it would be nice to decorate his high chair with some jungle grass and flowers.

Bryan's Highchair Decorations

Bryan's Smasher Cake


For the rest of the family, I decided to make cupcake and add cupcake toppers to them.  Each cupcake topper had "1st" written on one side and "birthday" written on the other.  I used the Cricut along with the Gypsy to make my own design.  

Cupcake toppers

Yellow and Green Cupcake Toppers

I had such a wonderful time making these.  I am thinking about adding them to an Etsy Store when I get that up and running.  What do you think?  I would love to hear from you.
Thanks for stopping by- Melanie

Wednesday, January 19, 2011

Bryan's First Birthday Shirt

I couldn't decide what I wanted Bryan to wear on his first birthday.  My crafty neighbor, Natalie, inspired me with some of the work she has been doing with Super Hero Capes and monogramming the child's initial on the back with felt. 

With my inspiration, I went the store and bought some felt as well as a plain navy t-shirt.  I decided to use a basic hexagon shape as the back drop for the number one.  I used the Cricut to cut out the two different size hexagons as well as the number one from card stock.  I them used these as a template for cutting my shapes and numbers from the felt.  Next I used "Heat and Bond" to adhere the felt to the shirt and then to each other.  Once everything was ironed in place, I then took coordinating cross stitch floss and sewed around the two hexagons.  I think it turned out pretty adorable and will probably be making one for Tyler's Fourth Birthday.

Next, I will share with you the invitation and birthday decorations that I created for his party.  Enjoy! 

Friday, January 7, 2011

Winter Snowflake Card

I have been exploring more with my Cricut and I love it!  Here is a quick card that I made for another Challenge by Momo.  This is 5 1/2" x 4 1/4" card that I made with the Paper Pups and Stretch Your Imagination cartridges.  The Pup is cut out at 3" and the snow flakes are cut out 1 1/2", 1" and 3/4".  Winter was cut out at 1 1/2".  More to come......